disable right click

Showing posts with label Needlecraft. Show all posts

Sunday, 10 November 2013

Applique Work


Applique work is such a versatile work. It is a technique where patches of fabrics are stitched on to another base fabric to create a design. The pieces of the fabrics are cut according to the shapes of the design chosen and then it is stitched on to another fabric using some decorative embroidery stitches.  

Geometric and floral patterns are used. Once you have mastered applique work you can be more self expressive, use your creativity to create more different patterns and effects. This technique can also be used to hide the flaws in a fabric. Applique work can be done by machine or by hand.

Velvet paisley motif 
appliqued on georgette
fabric

Velvet appliqued on net with crystal work done on it


Materials Required for Applique Work


  • Sharp scissors
  • Material for background and also for the design to be appliqued on the background fabric
  • Stainless steel pins
  • Embroidery Needle
  • Embroidery Thread

How to do Applique Work ?

1) The first step in applique is to decide and select a design. The next step is to decide on the technique you will be using to secure the applique to the background fabric i.e, either through hand or my machine. Then select the material for the background fabric. 

2) Take the material which has to be used as the design and has to be appliqued on the background fabric. Draw the selected design on to this material. Draw seam allowance of about 1/2" to 1". 


Motif to be appliqued is drawn with seam allowance 


3) Cut the design out leaving seam allowance for machine.

4) Now that the cut design applique piece and the background fabric is ready you can start pinning and basting the applique piece in place on the background fabric. 

5) Stitch with a series of running stitches or whip stitches or by machine do satin stitch. 


Image of the cut motif appliqued on the background fabric


6) Finish the corners of the background material to secure edges. 


'Om' Symbol appliqued on a georgette fabric and outlined with crystals


Velvet fabric appliqued on net and other types of embroidery done on it


Velvet appliqued on net with crystal embroidery done on it. This is a neckline design. 


Products where Applique Work is used


  • Kurtis
  • Lehengas
  • Sarees
  • Blouses
  • Anarkali and salwar suits
  • Western gowns
  • Table cloths
  • Purses
  • Bags
  • Curtains
  • Chemise
  • Pillows and pillow covers
  • Bed covers
  • Lamp shades and lots of other products

Friday, 1 November 2013

Sequins Embroidery


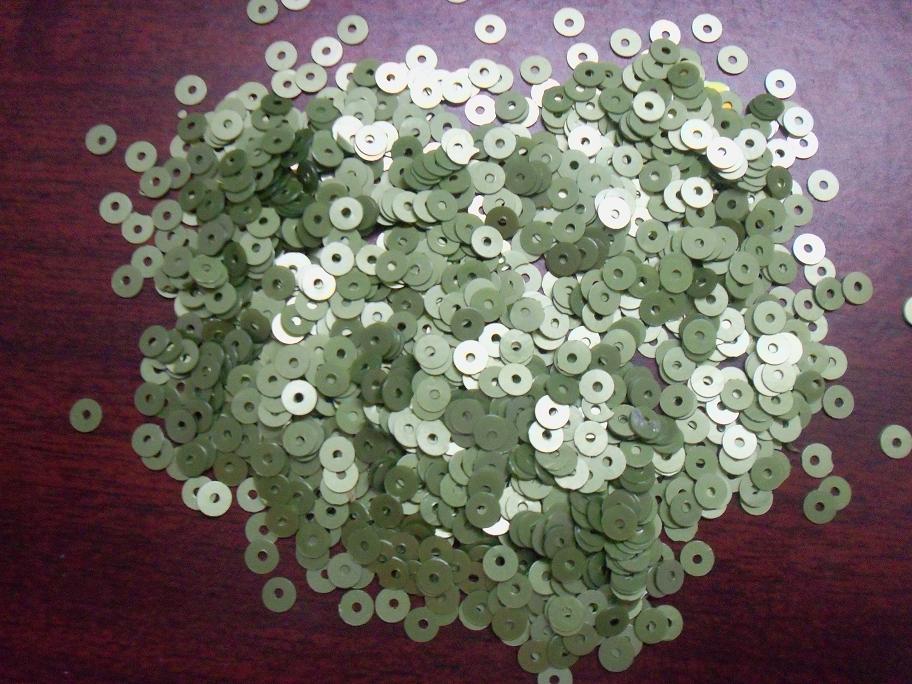
Sequins embroidery is a very beautiful and traditional embroidery work used for garment surface ornamentation. Sequins are any flat disc shaped material which are sewn on to the fabric for decorative purpose. I use sequins embroidery in wide variety of my designs including Indian, Indowestern and Western clothes and accessories too. There are wide varieties of sequins available for embroidery in different shapes, colors, sizes etc. In the below contents i have shared with you images of different types of sequins, different types of sequins work, beautiful products ornamented with sequins work, technique of attaching sequins on to the fabric and much more. 


Different Varieties of Sequins

As I have discussed before there are various types of sequins available in different sizes, shapes, colors etc. Different types of sequins like Ubaick, Katori sequins, rainbow sequins, devdas sequins, pani(water) sequins, matt sequins, tear drop sequins etc are used in varieties of clothing and accessories.


Matt sequins are opaque and are available in solid colors. Transparent sequins as the name says are transparent, it shines and takes the color of the base fabric on to which it is stitched and these are also called as pani sequins. Metallic sequins look like opaque discs in metallic colors and are used for material work. Rainbow sequins and devdas sequins shines in multi colors. There are sequins which shines in two colors too. There are katori sequins which are 3D in appearance. Sequins are available in various thickness.


Images of Various types of Sequins


Attaching sequins

There are number of ways of attaching sequins to the fabric. The thread will be visible to some degree and so to be selected carefully to match or contrast in a decorative fashion. As the thread will be repeatedly pulled through the sequins the thread should be strong and durable. Always work from right to left.

Back stitch, Double stitch, Simple running stitch can be used to attach the sequins.


 1) Insert the threaded needle from the wrong side of the fabric through the fabric and bring it to the front of the fabric.

2) Thread on a sequin through the hole at the centre of the sequins.

3)Bring the needle down at the edge of the sequins to the wrong side of the fabric.                                                 

4) Leave a stitch gap and insert the needle again from the wrong side of the fabric through the fabric and bring it to the front of the fabric and thread on another sequin.

5) Do the back stitch by inserting the needle down through the fabric at the same point where the first stitch ends(at the edge of the first sequins) and bring the needle up again leaving a stitch gap and continue doing the same steps until you finish the design.


Heavy Sequins work at the edges of a georgette dupatta


Here the sequins work is combined with other embroidery work such as stone work, bead work etc. This embroidery sample from cbazaar.


Sequins work done on a beautiful chiffon saree


                           Gold and silver seqins are used along with small sugar beads


Heavy embroidery using sequins and other embroidery work on a georgette fabric


Sequins work on neckline design


This sequins is similar to tear drop sequins but they are pointed at both the edges. This is a neckline design of an Anarkali. I just clicked the image before cutting and sewing the Anarkali.


Sequins embroidery border on a net dupatta


                 Embroidery border and scatters is done using sequins.


Sequins embroidery border combined with other embroidery work


Sequins work done using machine

Sequins work is also done using machines and computerised technique which is fast and easy. There are needles and different sewing machines available to sew the sequins on to the fabric. This is less expensive compared to hand embroidery and is much useful when it comes to mass production.

Images of machine and computerised embroidered sequins work


Black Sequins Border


Border with Silver Katori Sequins


Friday, 23 August 2013

Zardosi and Zari work


Zardosi and Zari work are popular embroidery works used in almost all kinds of clothing especially in Indian and Indo Western wear, home furnishings and accessories. This embroidery is the earliest and has ancient origin. During mughal times kings wore clothes embroidered with zari and zardosi work. This embroidery work has a very rich look and is expensive. Zardosi and Zari are shiny circular metallic threads which look like wires and are available in gold, silver and in other colors too. They are available in various widths. 

The images below will clearly shows what is zari and zardosi work


Zari embroidered motif done using tiny chain stitches


The fabric is first stretched and fixed uniformly on a big wooden frame. The design or the motif is traced on it and then embroidery is done. This embroidery uses a hook to do the stitch.The stitches used are chain stitch, satin stitch, couching, running and stem stitch. The embroidery is usually combined with other types of embroidery work like sequins work, bead work, resham work, kora work, gotta work, stone work, applique work etc.


Zardosi embroidery is done along with stone work


Zari work has a flat look whereas zardosi has a thick three dimensional look. Zardosi work is more heavier compared to zari work and is more expensive too. Though lots of other colors are used gold and silver are the most popular colors. Zari embroidery can be done on any fabric ranging from light weight to heavy weight. Heavy zardosi can be done on medium to heavy weight fabrics. Light weight fabrics would not be able to take the weight of zardosi work if the work is done heavily. 


zardosi work is done combined with sequins and bead work. 


As you can see in the above images where zardosi work is done, the motif or the design is outlined with zari embroidery where chain stitch is used and thus giving a well defined outline.

Applications

This embroidery is widely used in kurtis, salwars, sarees, lehengas, sherwanis, anarkalis, dupattas, lehenga sarees, wall hangings, cushion cases, pillow cases, mojris etc. 

Thursday, 14 March 2013

Patch Work

Patch work is a very interesting technique where patches or pieces of fabrics are stitched together to make a design. Patch work can be a simple combination of squares or may be a complex arrangements of different shapes. The procedure involves drafting a pattern, collecting materials, cutting and joining the blocks to create pieced fabrics. Interesting effects can be obtained by using different colored and textured fabrics. Using creativity lots of decorative designs can be made and used in wide varieties of different products. Banjara embroidery which is practiced by banjaras who are tribal people use lot of patch work in their products. 


Patch work sample


Materials Used


  • Fabrics for patches
  • Cardboard for the templates
  • Thread and needles
  • Scissor for cutting

Instructions on how to do Patchwork

1) The first step is to make a template of each piece in your patch work design.

2) Place it on the fabric and trace the design.

3) Before cutting leave some seam allowance on the fabric.


Design is drawn with seam allowance on three different fabrics as the design includes three fabrics


4) Cut each piece one at a time.


Cut pieces of fabrics


5) Join patch pieces by hand sewing. 

6) Do not stretch seam when you sew two bias edges together.

7) Finish the edges.


Image of the final design

Products where patch work is used

Patch work is used in wide variety of products like purses, kurtis, table cloths, bed covers, pillows, pillow covers, women's tops, wallets, sarees, children clothes, cushion covers, handicraft products, lamp shades, and wide variety of other products. 


Tuesday, 12 March 2013

Quilting Techniques

Quilting is a technique which involves sewing more layers of materials together to make a thick layer. Different beautiful patterns are used to sew them together giving decorative effects. It is also combined with other works such as patch work, applique work etc. Quilting is used to make wide varieties of products such as pillows, pillow covers, bed covers, wall hangings, table mats, clothing, cushion covers, etc. 

Quilted sample

Materials Required

  • Fabric for the quilt top and for backing and edging for finishing
  • If necessary underlining material. 

Instructions on how to do Quilting

1) Once your quilt top is completed the next step is choosing a quilting design that will enhance the quilt top. It is important that the design is compatible. 

2) Mark the design on the quilt top using a tailor's chalk. 

3) Then ensemble the materials you need to put the quilt together. 

4) Lay the backing on the floor, face down straight and with the corners square. Place the raised part and marked quilt top over the batting. Smooth it out and square the corners. 

5) Pin all the three layers together with running stitch, stitch in length wise and cross wise of the quilt. 

6) Then start quilting with machine or use running stitch if you are doing it by hand.

7) Finish the edges of the quilt with borders or by binding a fabric around the edges. Some fancy laces can also be used to finish the edges. Ruffles also give a different decorative effect to the edges. 


Sunday, 10 March 2013

Braiding

Braiding is a special technique used for making rugs. The technique is similar to how you plait your hair. It is easy to do and the material requirement is also minimum. Different color fabrics, scissors, heavy thread, tailors chalk and needles are all that which is required for braiding. 


Image of a braided sample

Technique of doing Braiding

The amount of fabric needed depends on the size of the rug. 

1) Cut the fabric into three strips 2 to 4 inches wide depending on the desired thickness of the rug. Cut the fabric in straight grain to minimize stretching. 

2) Join the strips together and make a knot. Before knotting fold the strips into half lengthwise so that the raw edges meet at the centre. Then again fold the strip into half and role the strip. Finish it with invisible hem. 


Image showing how to fold the fabric strips


3) Braid by bringing the left strip over the middle strip. Then bring the right strip over the middle strip like how you plait hair. 


Image showing how to braid


4) This is repeated till the whole length. 

5)Shape the braided strip into rugs and lace them together. 


Rugs can be in circular form or in squares. Lacing is done using a strong thread and a carpet needle. 

Wednesday, 6 March 2013

Couching

Couching Technique


Lord Ganesha motif embroidered with couching stitches


Couching is a technique where one or more threads are laid along the surface of the fabric attached with a series of small stitches usually in a finer thread. This thread can be of the same color as that of the laid thread or contrast color thread can also be used for decorative effects. It is easy to do and is interesting too. Different interesting effects can be created by couching the thread using other type of embroidery such as Herring bone stitch, Blanket stitch, Cross stitch, Chain stitch etc. Couching is also sometimes used to hide the flaws in the fabric. You can also use your creativity to create different decorative patterns by using a different material instead of embroidery thread to anchor the laid thread. 

How to do Couching?


1) Work form right to left. Bring the laid thread to the front of the fabric and lay it along the motif to be embroidered. 

2) Thread a needle with the anchoring thread which can be of the same color as that of the laid thread or a different contrast color to get a different decorative effect. Insert the needle through the fabric and bring it to the front of the fabric. 

3) Do a stitch covering the laid thread bringing the anchoring thread just above the laid thread and bring it down below it. 

4) Continue this stitch evenly on the design over the laid thread. 

Very sharp corners can be achieved by cutting the laid thread at the corner and taking it at the back of the fabric. If two threads are being couched then finish the inner one first then the outer one. Circular effects and triangular effects can also be achieved by couching. Couching is also done using machine. 


Couching Stitches or Patterns


Types of Couching 


There are various types of couching such as 
  • Laid Work
  • Bokhara Couching
  • Underside Couching 
  • Roumanian Couching

Applications of Couching

Couching is used in variety of tapestry and home furnishing products. Sometimes it is also used for products like pillow covers, some antique purses, trims etc.