disable right click

Sunday 20 January 2013

Smocking Techniques

                     
Today i would like to write about smocking techniques. Smocking is an ornamental stitching where the fabric is gathered so that garment can be made without fastening as the smocked area can be stretched. It is suitable for yoke, bodice and cuffs. The technique has been known atleast since early medieval times but became especially popular in 17th and 28th century. It was traditionally used for farm quarkers smocks. They were loose outer garments worn to protect their clothes hence its name.

Today smocking is used primarily for babies and children's clothes and lingerie but it can be used for items purely for its decorative purpose.

Materials used for smocking techniques

Light weight cotton fabrics are most often chosen for smocking as the fabric must gather easily. Lacons and voiles are generally used. The fabric must be stable so that the design is not distorted. Knit fabrics are therefore not suitable. Smocking can be worked on fabrics with small regular patterns but it will not look good on fabric with larger or bold patterns.


Mostly cotton and silk threads can be used. Only one or two strands are used for fine fabrics though three or more may be used on heavier ones.

Smocking is worked with a crewel needle.

How to do smocking?

Gathering


Before beginning the embroidery the fabric must be gathered. This will reduce the width of the fabric, so begin with a piece three times as wide as how much ever will be required  for the item. Always first ensure it will not shrink. Work a test piece so that you will know how it will look. Leave atleast 2.5 cms(1") all around the smocked area and oversew or bind the edges to prevent fraying.


Traditional Method of Gathering

On the wrong side of the fabric mark a grid of dots, aligning them on the straight grain. To do this place dress markers carbon paper on the fabric and a sheet of graph paper over it. Press a ball point pen against the intersections. Dots are usually 3 to 6 mm(1/8" to 1/4") apart and just be careful so that they do not smudge.

Flatten out the fabric. Using sewing thread in a color that contrast with the fabric, thread a needle; knot the end of the thread and make running stitches across each row of dots on the fabric. Leave a tail of thread at the end of each row. After finishing the running stitches, pull the tail of thread which you left at the ends of each row to make the gathers. Gathered threads are removed once the smocking is completed.


Image of backside of the fabric after gathering it


Alternative Method

Smocking can also be worked on fabrics with small regular patterns such as checks, dots of tiny flowers without the need for making dots. The pattern is used as guide for the gathering.


Mock smocking in which the dots are marked on the right side of the fabric and the smocking is worked out without prior gathering is also becoming more common.

General Methods For Smocking

Now the gathered fabric is ready for the decorative embroidery stitches to be done on the fabric.

1)    Mark the center of the gathered area at the top and the bottom as a guide for later positioning of the garment pattern.

2)   Work on the right side of the fabric along the row of gathered stitches from left to right.

3)    Always anchor the thread firmly at the beginning of the row, using a double back stitch or a smocker knot.  

4)     At each stitch pick only the top thread of the pleat and always keep the needle horizontal and always pick up one pleat at a time.

5)    Make each stitch either above the gathering thread or below it. Never make a stitch across it or the embroidery will be distorted or damaged when you remove the gathering threads.

Smocking Stitches


Applications of Smocking

Smocking technique has its wide application in children's clothing. Other products include prom dresses, pillow covers etc. 

Saturday 19 January 2013

Drawn Thread Work

What is Drawn Thread Work?

Drawn thread work is a very interesting form of embroidery work where either the vertical or horizontal threads are pulled and removed from the fabric and decorative embroidery patterns are worked on the remaining threads. It is also called as counted thread work or pulled fabric work. 

They have wide applications in home furnishings. This technique is used only in narrow bands mostly for borders on linen particularly for table cloths. This can also be combined with surface embroidery. 


How to do Drawn Thread Work? 

1) Determine the area for drawn thread band allowing for hem if required. 

2) Tack the area around with embroidery stitch and also mark the center of the band with tacking. 

3) Within the determined area of the band, pull or remove either the horizontal or the vertical threads. you can use small sharp scissor to cut it before pulling but make sure you do not spoil the remaining threads which should not be removed. 

4) Now that you have removed either horizontal or vertical threads, there will be threads only in one direction either vertical threads or horizontal threads. Decorative embroidery patterns can be worked on the remaining threads. But before working make sure the threads look neat. 

5) Start the embroidery stitches from the wrong side of the fabric, work upwards using small back stitches to hold the threads tightly. 

6) Variations can be created by using creativity by dividing the set of threads evenly in a different manner. Overcasting, Button hole, satin stitch etc are used to create variations. 


Drawn Thread Work Decorative Stitches or Patterns


Applications of Drawn Thread Work

Drawn thread work is widely used on linens mainly for table cloths. It is also used on products like pillow cases, handkerchiefs, tray cloths, some scarfs etc.  

Tuesday 15 January 2013

Cutwork Embroidery Techniques


Introducing Cutwork Embroidery


Cutwork embroidery is an antique and amazing handwork which can be used to create thousands of different beautifully crafted products. It first became popular in 16th century. This art can also be practiced as a hobby. You can create different patterns for cutwork or there are lot of books on cutwork patterns from which you can take the designs from. Internet also gives you a lot of designs for cutwork. 

This is a technique where portions of the fabric is cutout and the cutout edges finished with embroidery stitches to create beautiful patterns. Embroidered bars are used to bridge the larger areas. 


Ganesha motif done using cutwork embroidery


Tools Used for Cutwork Embroidery

Fabrics

The base fabric used for cutwork can be any fabric which is not too thin. Cavas, linen or cotton can be used.

Embroidery Threads 

Self color embroidery thread or in other words thread in the same color as that of the fabric is used to finish the edges of the cut portion of the base fabric. Other color threads can be used for other areas of the design and to create different decorative effects. 

Embroidery Needles

The embroidery needles which is used for the other hand embroidery can be used for the cutwork embroidery too. 

Cutwork Thread Snip

This is used to trim the excess threads. 

A Small Scissor

A Small scissor to cut the portions of the fabric to create the design.

Tracing Paper

You need a tracing paper to transfer the design on to the fabric. 

Stitches used for the Cutwork Embroidery

Button hole and satin stitch are commonly used for the cutwork hand embroidery. Running stitch and double button hole are also sometimes used. 


Button hole stitch can be worked more closer as compared to what you see in the image so that the background fabric is not seen. 


Step by step Instructions on how to make Cutwork Hand Embroidery

1) Use the tracing paper to trace the cutwork pattern on to the fabric. Mark the design using parallel lines for button hole stitch. 

2) Place canvas across each area to be cut. 

3) Using the same color thread do the outline with running stitch then with button hole stitch. 

4) You can use double button hole stitch if both the sides are to be cut. 

5) Complete any other extra embroidery you would like to do.

6) Using small sharp scissors cut away the unwanted fabric portions.


Cutwork Machine Embroidery

Cutwork embroidery is also done using embroidery machines which is fast and the result is neater. It is also easy compared to hand cutwork embroidery. 


Wide varieties of Tools and Materials used for Embroidery


The tools and materials are the raw materials used for the embroidery. There are wide varieties of tools and materials available in the market which can be used for embroidery and they are selected depending upon the type of the embroidery work. The embroidery materials that you select for the embroidery to a great extent affects the quality of the embroidery work done using those materials and so has to be selected wisely. 

Tools used for embroidery


Embroidery Threads

Embroidery threads are available in different colors, thicknesses, and can also be made up of different fibres. They are sometimes twisted and used as one thread and sometimes single strands of threads are used. When the thread has many strands, single strand is separated and used. 


Cotton Threads

There are various types of cotton threads. They are


  • Cotton thread where six strands of threads are loosely twisted together. Single strand or two strands are separated from them and used for embroidery.
  • Lustrous two ply thread which cannot be separated and so is used as such.
  • Thick and matt finished 5 ply thread which is used for embroidery on heavy fabrics.
  • Tightly twisted thread soft, fine and with less lustrous finish.

Silk Threads

Pure silk thread is used which is available in wide varieties of colors, the strands of which can be separated and used like the cotton threads. This must be dry cleaned and is not as easy to work as cotton threads. 

Fabric

Fabric quality plays an important role in the quality of the embroidery work done on it. The fabric is selected according to the style of the embroidery chosen. 


Needles

There are embroidery needles available in different sizes and types. Different types of needles are used for different styles of the embroidery. Different types of needles include


  • Long eyed needles
  • Round eye needles
  • Tapestry needles
  • Poker etc.


Scissors

The scissors are used to cut the fabric and to trim the threads. There are different types of scissors such as 

  • Dress makers scissors
  • Small pointed scissors
  • Pointed scissors etc. 


Trimmer


Trimmer is used to trim the excess threads.


Embroidery Frames

Embroidery frame is used to hold the fabric tight in place to facilitate embroidery. Embroidery frames can be wooden or plastic which are called hoops. There are square and rectangle frames too. 


Threader

A threader is used to thread a needle. 

Thimble

A thimble is used to protect the finger during embroidery. 


Unpicker

This is used to undo mistakes during embroidery. 


Other tools are also used such as


  • Tracing paper to trace the design on to the fabric
  • Board kin
  • Zigzag scissors
  • Glue to stick sticking stones on the fabric in stone work.
  • Ruler, pencil etc if required.

There are lots of books about embroidery designs and patterns and lots of designs are available in internet too from which the designs can be taken. You can use your creativity to design you own embroidery patterns too. Once you have got all the materials and tools ready for embroidery trace the pattern on to the fabric using tracing sheet; fix the fabric on to the embroidery frame; thread the needle and start with the embroidery. Though it is tiring at the beginning it comes through practice. 

Wide Varieties of Materials used for the Embroidery

  • Stones including plastic and glass stones
  • Crystals
  • Zardosi
  • Zari
  • Kora
  • Beads
  • Sequins
  • Pearls
  • Precious stones and semi precious stones
  • Gotta
  • Mirrors including plastic and glass
  • Ribbon for ribbon embroidery etc

In my other posts i will write in detail about various types of embroidery work done using the above mentioned materials. 


Saturday 12 January 2013

Embroidery basics - Basic stitches


Embroidery is an art of surface ornamenting the fabric with beautiful decorative stitches. 
By using a variety of beautiful embroidery stitches, the fabric can be made more attractive. In India it has been practiced since 16th century. 

Hand embroidery could be difficult at the beginning but comes through practice. Nowadays embroidery is used in wide varieties of clothes such as kurtis, western gowns, veils, kerchiefs, dresses, sherwanis, salwars, sarees, lots of accessories etc. 

In the below contents i have written about various stitches used in embroidery, i have also shared with you the images of Lord Ganesha motifs embroidered with those embroidery stitches. 


Classification of Embroidery Stitches 

Basic embroidery stitches can be classified in to 5 groups. 

  • Line stitches
  • Chain stitches
  • Loop stitches
  • Flat stitches
  • Knot stitches
In this post i will write about basic stitches used in embroidery.


Line stitches

Lines stitches as the name says consists of fine lines. These stitches are very easy to work. These stitches can be used for making outlines, on motifs, for filling complete shapes etc. They can also be used as padding stitches. 

There are different types of line stitches like 


Lord Ganesha Motif Embroidered with Line stitches


Chain stitches

There are variety of chain stitches which can be used to do lot of decorative works. It can be used to fill motifs, for outlines etc. Here is the sketch of different types of chain stitches. 


Lord Ganesha Motif Embroidered with Chain stitches


Loop stitches

These stitches can be used for outlines or to fill the entire motifs. Check the below sketch for the different types of loop stitches.


Lord Ganesha Motif Embroidered with Loop
stitches


Flat stitches

These are the stitches which are used to fill a motif. These are flat stitches which can be used creatively to give various attractive effects. 


Lord Ganesha Motif Embroidered with Flat
stitches


Knot stitches

There are used along with the other embroidery stitches and gives decorative effects. There are various types of knot stitches such as 


  • French knot
  • Bullion knot
  • Fone legged knot
  • Scroll stitch
  • Corel knot
  • Palestina stitch

Lord Ganesha Motif Embroidered with Knot
stitches


I didn't sketch the knotted stitches as it so messy to sketch a knot. 

These are the few basic stitches. There are other decorative stitches such as couching, bead work, sequins work, wheel stitch, spider stitch, sted stitch, cross stitch,  star stitch, straight stitch etc. 

Tuesday 1 January 2013

Bead Work, Pearl Work And Material Embroidery Work


The art of bead embroidery is one of the most popular embroidery work used in lots of varieties of apparel clothing, accessories and other products. The bead work is used seperately or combined with other types of embroidery such as sequins, zari, zardosi, crystal etc. Beads come in all variety of shapes, sizes, colors etc. Bead work is a very old form of embroidery. Beads are stitched to the fabric for decoration adding textures and richness to the end use. Any hollow small item with a hole can be used in bead work. 

Pearls are again hollow material with a hole at the center and is embroidered the same way as that of the beads. Material work is done using fancy material in different shapes and sizes. In the following contents i have written about the method of attaching beads; different varieties of beads and different methods of bead work; images of various fabrics embroidered with bead work, pearl work, and material work combined with other types of embroidery, Indian traditional bead embroidery and much more

Materials required for bead embroidery

  • Fabric -  Any fabric on which bead embroidery has to be done.
  • Embroidery thread - Cotton embroidery thread or nylon thread. 
  • Trimmer - To trim the thread.
  • Beads/ Pearls/ Materials - Bead/ pearls/ Materials which are to be sewn on to the fabric. 
  • Embroidery frame -  Embroidery frame to keep the portion of the fabric tight to make it convenient for the embroidery. 
  • Embroidery needle -  There are wide varieties of embroidery needles available. The size of the needle can be chosen according to the size of the bead and the size of the hole in the bead. 

How to attach a bead to the fabric?

A simple bead can be easily attached to the fabric.


1) Thread a needle and make a knot at the end of the thread. Fix the fabric on the embroidery frame. Now the fabric is ready to be embroidered. 

2) Bring the threaded needle from the back of the fabric to the front of the fabric at the point where the bead has to be attached. 

3) Take a bead and insert the needle through the hole in the bead and return the needle to the back of the fabric and fasten it. 

4) A number of beads strung on to a strong thread can be couched on to the surface of the fabric. This is a quicker method if you are covering a large area with beads. 

Bead Varieties

There are wide varieties of beads like sugar beads, bugle beads, glass beads, plastic beads, stone beads etc. Beads are available in different sizes, shapes, colors etc. There are beads which are solid and there are transparent beads too. Thin cylindrical beads which are hollow in shape called as bugle beads are also available. Few beads have a matt look and few are shiny. There are bead which shines in multi colors too like rainbow sequins. Pearls and materials are also available in different colors, sizes and shapes. I have shared with you a lot of images of  embroidery work done using different varieties of beads, pearls and materials in the below contents. 


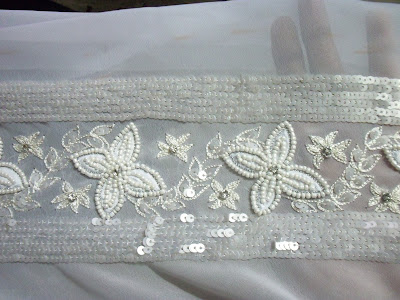
Embroidery border done using pearls and sequins work


A beautiful neckline embroidery done on a brocade fabric using beads combined with thread work and kora work. 


                                                   Image of sugar beads


           Beautiful butti done on blue silk using white pearls and silver zari work


Material work butti combined with zari work and stone work done on brocade fabric


  Images of two different types of materials which can be stitched on to the fabric for decorative purpose


Material work border 


                         Embroidery sample done using white bugle beads


 Embroidery done on a sleeve piece on a velvet fabric using tubular shaped beads shining in multi colors


       Neckline embroidery on a satin fabric done using stone work and bead work


                         Embroidered butti done using beads and a stone


      Appliqued flower design embroidery border using pearl embroidery combined with other embroidery  


                         Embroidery border using silver sequins and stones


              Embroidery motif done using zardosi, stone, sequins and bead work


Indian Traditional Bead work embroidery

Saurashtra Bead Work

Kutch and Kathiawar are famous for bead work. Many designs using beads are created where the entire surface is built up out of beads. The background is of white beads and the pattern is done using colored beads. The size of the beads are uniform to get a rich effect. This type of bead embroidery shows only beads and not the fabric. 

The motifs like elephant, camel, petal, creepers and flowers are used. The principal colors of the beads are yellow, green, red, purple and blue. Deep bottle green and bush green are the most desirable colors. 

Telangana Bead Work

Here the bead work is done on choli and worn by Women. This was practiced in small village called pemborti. 

Blue colored fabric is used on which the work is done with white thread and needle. Wide range of designs are used in varieties of products such as sarees, home furnishings like bed covers etc. 


Bead Work Using Machines

As any other type of embellishments bead work can also be done using machine embroidery which is faster and is suitable for mass production as any other embroidery work done on machines. There are various computerized sewing machines which is used to sew beads and sequins on to the fabric.