disable right click

Thursday, 14 March 2013

Patch Work

Patch work is a very interesting technique where patches or pieces of fabrics are stitched together to make a design. Patch work can be a simple combination of squares or may be a complex arrangements of different shapes. The procedure involves drafting a pattern, collecting materials, cutting and joining the blocks to create pieced fabrics. Interesting effects can be obtained by using different colored and textured fabrics. Using creativity lots of decorative designs can be made and used in wide varieties of different products. Banjara embroidery which is practiced by banjaras who are tribal people use lot of patch work in their products. 


Patch work sample


Materials Used


  • Fabrics for patches
  • Cardboard for the templates
  • Thread and needles
  • Scissor for cutting

Instructions on how to do Patchwork

1) The first step is to make a template of each piece in your patch work design.

2) Place it on the fabric and trace the design.

3) Before cutting leave some seam allowance on the fabric.


Design is drawn with seam allowance on three different fabrics as the design includes three fabrics


4) Cut each piece one at a time.


Cut pieces of fabrics


5) Join patch pieces by hand sewing. 

6) Do not stretch seam when you sew two bias edges together.

7) Finish the edges.


Image of the final design

Products where patch work is used

Patch work is used in wide variety of products like purses, kurtis, table cloths, bed covers, pillows, pillow covers, women's tops, wallets, sarees, children clothes, cushion covers, handicraft products, lamp shades, and wide variety of other products. 


Tuesday, 12 March 2013

Quilting Techniques

Quilting is a technique which involves sewing more layers of materials together to make a thick layer. Different beautiful patterns are used to sew them together giving decorative effects. It is also combined with other works such as patch work, applique work etc. Quilting is used to make wide varieties of products such as pillows, pillow covers, bed covers, wall hangings, table mats, clothing, cushion covers, etc. 

Quilted sample

Materials Required

  • Fabric for the quilt top and for backing and edging for finishing
  • If necessary underlining material. 

Instructions on how to do Quilting

1) Once your quilt top is completed the next step is choosing a quilting design that will enhance the quilt top. It is important that the design is compatible. 

2) Mark the design on the quilt top using a tailor's chalk. 

3) Then ensemble the materials you need to put the quilt together. 

4) Lay the backing on the floor, face down straight and with the corners square. Place the raised part and marked quilt top over the batting. Smooth it out and square the corners. 

5) Pin all the three layers together with running stitch, stitch in length wise and cross wise of the quilt. 

6) Then start quilting with machine or use running stitch if you are doing it by hand.

7) Finish the edges of the quilt with borders or by binding a fabric around the edges. Some fancy laces can also be used to finish the edges. Ruffles also give a different decorative effect to the edges. 


Sunday, 10 March 2013

Braiding

Braiding is a special technique used for making rugs. The technique is similar to how you plait your hair. It is easy to do and the material requirement is also minimum. Different color fabrics, scissors, heavy thread, tailors chalk and needles are all that which is required for braiding. 


Image of a braided sample

Technique of doing Braiding

The amount of fabric needed depends on the size of the rug. 

1) Cut the fabric into three strips 2 to 4 inches wide depending on the desired thickness of the rug. Cut the fabric in straight grain to minimize stretching. 

2) Join the strips together and make a knot. Before knotting fold the strips into half lengthwise so that the raw edges meet at the centre. Then again fold the strip into half and role the strip. Finish it with invisible hem. 


Image showing how to fold the fabric strips


3) Braid by bringing the left strip over the middle strip. Then bring the right strip over the middle strip like how you plait hair. 


Image showing how to braid


4) This is repeated till the whole length. 

5)Shape the braided strip into rugs and lace them together. 


Rugs can be in circular form or in squares. Lacing is done using a strong thread and a carpet needle. 

Wednesday, 6 March 2013

Couching

Couching Technique


Lord Ganesha motif embroidered with couching stitches


Couching is a technique where one or more threads are laid along the surface of the fabric attached with a series of small stitches usually in a finer thread. This thread can be of the same color as that of the laid thread or contrast color thread can also be used for decorative effects. It is easy to do and is interesting too. Different interesting effects can be created by couching the thread using other type of embroidery such as Herring bone stitch, Blanket stitch, Cross stitch, Chain stitch etc. Couching is also sometimes used to hide the flaws in the fabric. You can also use your creativity to create different decorative patterns by using a different material instead of embroidery thread to anchor the laid thread. 

How to do Couching?


1) Work form right to left. Bring the laid thread to the front of the fabric and lay it along the motif to be embroidered. 

2) Thread a needle with the anchoring thread which can be of the same color as that of the laid thread or a different contrast color to get a different decorative effect. Insert the needle through the fabric and bring it to the front of the fabric. 

3) Do a stitch covering the laid thread bringing the anchoring thread just above the laid thread and bring it down below it. 

4) Continue this stitch evenly on the design over the laid thread. 

Very sharp corners can be achieved by cutting the laid thread at the corner and taking it at the back of the fabric. If two threads are being couched then finish the inner one first then the outer one. Circular effects and triangular effects can also be achieved by couching. Couching is also done using machine. 


Couching Stitches or Patterns


Types of Couching 


There are various types of couching such as 
  • Laid Work
  • Bokhara Couching
  • Underside Couching 
  • Roumanian Couching

Applications of Couching

Couching is used in variety of tapestry and home furnishing products. Sometimes it is also used for products like pillow covers, some antique purses, trims etc.  


Thursday, 28 February 2013

Ribbon Embroidery

Ribbon Embroidery is a very beautiful and colorful embroidery and is also one of the oldest form of embroidery. Ribbons are narrow strips of decorative fabrics. Ribbons used for ribbon embroidery are available in different sizes, colors and widths. They can also be made of of different fabrics. Synthetics and silk ribbons are mostly used. Other fabrics such as cotton, taffeta, organza, polyester, satin etc are also used. Ribbon embroidery is also called as fancy work.

There are no restrictions on the colors used for the ribbon embroidery, wide varieties of colorful ribbons are used in all widths. Ready made ribbons can be used which are manufactured in small widths to be used as ribbons itself. Fabric strips cut from fabrics can also be used. 

Various stitches such as running, stem, straight stitch, satin stitch etc are used. Knot stitches can also be used sometimes carefully so it does not become messy.

To know more about these embroidery stitches please visit my blog post about embroidery stitches by clicking the below link.

http://gennextfashions.blogspot.in/2013/01/embroidery-basics-basic-stitches.html

 Flower motifs are mostly used. The best suitable fabric for ribbon embroidery is cotton or linen. Ribbon embroidery can be done on loosely woven fabrics. 


Image of a ribbon embroidery motif


Materials Required for Ribbon Embroidery

  • Plain woven fabric which is woven loosely
  • Ribbons in the required width and the color
  • Embroidery needle which is suitable for the ribbon
  • Embroidery frame
  • Scissors


How to do Ribbon Embroidery?

1) Thread a needle and insert it through the fabric from the wrong side of the fabric and bring it to the front of the fabric. 

2) Insert the ribbon through the needle. 

3) You can start working embroidery stitches. Make short lengths of stitches so that the ribbon does not look ragged. 

4) As the ribbon embroidery does not look neat at the wrong side finish the ribbon by threading under some of the ribbon on the wrong side. 

5) To create a different effect you can also bring the ribbon out and make stitches directly through the ribbon. This is called as ribbon stitch. 

Applications of Ribbon Embroidery


Ribbon embroidery has wide applications like children's clothing, purses, women's tops, skirts, pillow cases, western gowns, lingerie, table covers, bags, show pieces made of fabrics, wall lights and ceiling lights etc. 

Wednesday, 13 February 2013

Mirror Work or Shisha Work or Glass Work


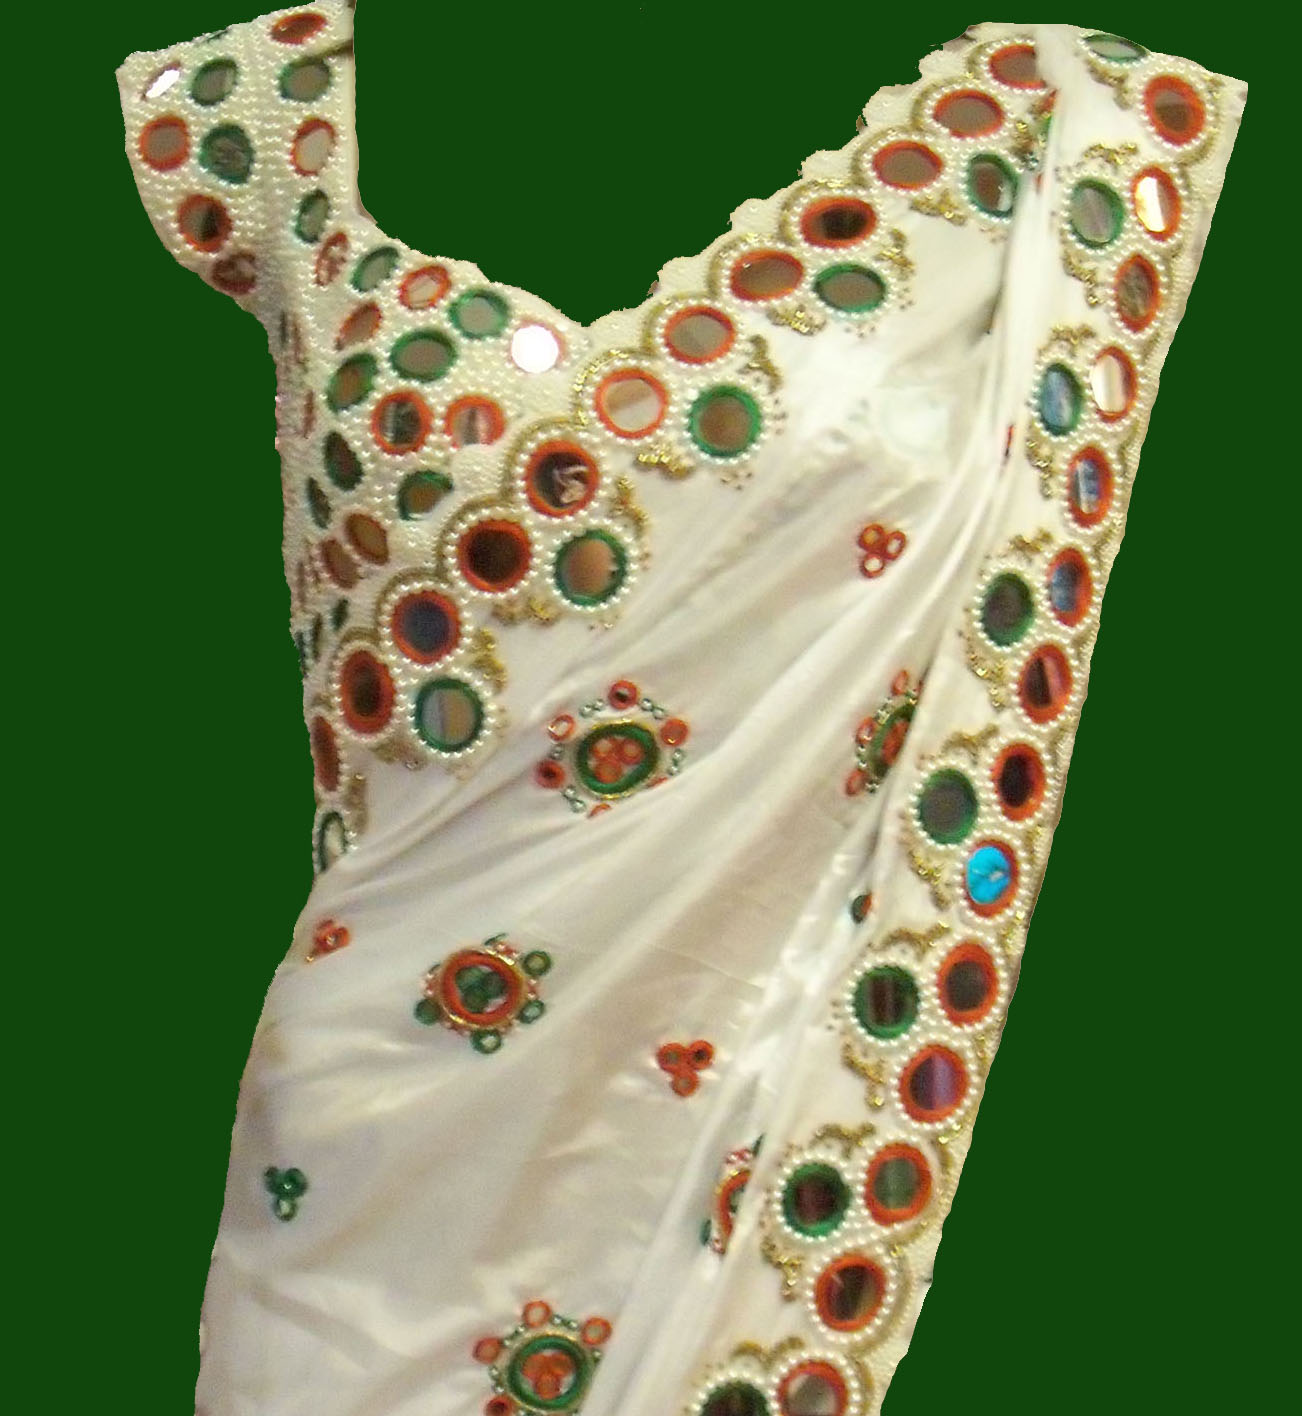
Mirror Work or Shisha Work is an oldest ethnic form of embroidery where the mirror which is a flat piece which can be made of glass or plastic is attached on to the fabric using embroidery stitches to give decorative effects. It is a very traditional form of embroidery. 

The mirrors can be in various sizes and shapes and can be made up of plastic or glass. The use of the glass mirrors on the fabric gives a very original look but adds to the weight of the fabric. So using lots of glass mirrors on light weight fabrics like chiffon or georgette is not a good idea as it might spoil the fabric. Plastic mirrors, though it does not give much original look can be easily used on light weight fabrics as they are light in weight. The shape of the mirror can be square, circle, diamond, traingle, polygon etc. 

Mostly Button Hole stitch is used to attach mirrors on to the fabric. Mirror work can be done by hand or by machine. Other embroidery stitches can also be used to add to the decorative effect. 

In this post i have shared with you the technique of doing mirror work and images of different mirror work samples and products. 


Lord Ganesha motif embroidered with mirror work combined with other types of embroidery


How to do Mirror Work?

1) Hold the mirror in place on the fabric. 

2) Insert the threaded needle from the wrong side of the fabric through the fabric and bring it to the front of the fabric. Take it over the mirror and make four grids like a square on the mirror. 


3) Now bring the needle to the side of the grid and continue working button hole stitch around the grid. 


Images of Mirror Work Samples and Products


Mirror embroidered saree and blouse

Plastic mirror work sample

Mirror work sample combined with bead and pearl embroidery

Choli embroidered with mirror work


Applications of mirror work

As said before mirror work is often combined with other colorful embroidery stitches for decorative effects. Mirror work is widely used in products like bags, pillow covers, women's tops, kurtis, Sherwanis, women's foot wears, lehengas and cholis, sarees etc. Banjara embroidery which is a kind of tribal embroidery practiced by tribals of karnataka and Andhra Pradesh use mostly mirror work in their Products. 

Mirror Work Using Machine

Like other type of embroidery, mirror work can also be done using machines which is more faster and easier compared to hand embroidery. 


                          Image of a mirror embroidery sample done using machine

Sunday, 20 January 2013

Smocking Techniques

                     
Today i would like to write about smocking techniques. Smocking is an ornamental stitching where the fabric is gathered so that garment can be made without fastening as the smocked area can be stretched. It is suitable for yoke, bodice and cuffs. The technique has been known atleast since early medieval times but became especially popular in 17th and 28th century. It was traditionally used for farm quarkers smocks. They were loose outer garments worn to protect their clothes hence its name.

Today smocking is used primarily for babies and children's clothes and lingerie but it can be used for items purely for its decorative purpose.

Materials used for smocking techniques

Light weight cotton fabrics are most often chosen for smocking as the fabric must gather easily. Lacons and voiles are generally used. The fabric must be stable so that the design is not distorted. Knit fabrics are therefore not suitable. Smocking can be worked on fabrics with small regular patterns but it will not look good on fabric with larger or bold patterns.


Mostly cotton and silk threads can be used. Only one or two strands are used for fine fabrics though three or more may be used on heavier ones.

Smocking is worked with a crewel needle.

How to do smocking?

Gathering


Before beginning the embroidery the fabric must be gathered. This will reduce the width of the fabric, so begin with a piece three times as wide as how much ever will be required  for the item. Always first ensure it will not shrink. Work a test piece so that you will know how it will look. Leave atleast 2.5 cms(1") all around the smocked area and oversew or bind the edges to prevent fraying.


Traditional Method of Gathering

On the wrong side of the fabric mark a grid of dots, aligning them on the straight grain. To do this place dress markers carbon paper on the fabric and a sheet of graph paper over it. Press a ball point pen against the intersections. Dots are usually 3 to 6 mm(1/8" to 1/4") apart and just be careful so that they do not smudge.

Flatten out the fabric. Using sewing thread in a color that contrast with the fabric, thread a needle; knot the end of the thread and make running stitches across each row of dots on the fabric. Leave a tail of thread at the end of each row. After finishing the running stitches, pull the tail of thread which you left at the ends of each row to make the gathers. Gathered threads are removed once the smocking is completed.


Image of backside of the fabric after gathering it


Alternative Method

Smocking can also be worked on fabrics with small regular patterns such as checks, dots of tiny flowers without the need for making dots. The pattern is used as guide for the gathering.


Mock smocking in which the dots are marked on the right side of the fabric and the smocking is worked out without prior gathering is also becoming more common.

General Methods For Smocking

Now the gathered fabric is ready for the decorative embroidery stitches to be done on the fabric.

1)    Mark the center of the gathered area at the top and the bottom as a guide for later positioning of the garment pattern.

2)   Work on the right side of the fabric along the row of gathered stitches from left to right.

3)    Always anchor the thread firmly at the beginning of the row, using a double back stitch or a smocker knot.  

4)     At each stitch pick only the top thread of the pleat and always keep the needle horizontal and always pick up one pleat at a time.

5)    Make each stitch either above the gathering thread or below it. Never make a stitch across it or the embroidery will be distorted or damaged when you remove the gathering threads.

Smocking Stitches


Applications of Smocking

Smocking technique has its wide application in children's clothing. Other products include prom dresses, pillow covers etc.